- Internet created 1990 by Tim Bernard Lee (Brit) and a Belgian dude
- They used to work for CERN (Hadron Collider)
- First ever server was a NeXT server - Created by Steve Jobs after being sacked from Apple - then earn't enough money to buy Apple.
- HTML (hyper text markup language)
- URL = Domain name
- WYSIWIG - what you see is what you get
- Dreamweaver can only accurately show you what your website will look like if it's html - css it struggles.
- Java script (plug ins) - hard to hand code - but you can steal and customise existing pieces of java script.
- It's okay to re-use other peoples java script
- CMS : content management system (like facebook - constantly updating)
Two kinds of website :
- Static website - less useful - nothing ever changes (e.g.ads)
- Dynamic website - interactive
Working with a client :
- sketch out design (scan) and site map
- draw up contract
- no more than 3 changes to the design (after the sketch has been agreed)
- After 3 they have to pay per hour
- make sure ALL pages link to one another
- get client to put together some inspirations (e.g.
- create swatches of the colour palette you are going to use (with hex codes) before you start
- choose fonts and font sizes before you start
- £500 for diy website - basic - took simon 6 hours - without working with a coder and creating something really complicated should really charge more than this. (£200-£700).
- Promotion - word of mouth only gets enough business.
- Most websites are 800px x 600px - follows 1990's guidelines.
- breaking these guidelines is more interesting...
- e.g. scroll left to right rather than up and down
- buttons tend to be square/rectangle (rather than shaped) because html responds to this. This is changeable in CSS.
- Need to make sure you website works accross multiple browsers - including iphone screen.
MAKING A WEBSITE IN DREAM WEAVER
-Never use numbers/glyphs/spaces/caps/no more than 8 characters
create new html. site
to link to route folder : site>new site>
this should now show in the files panel
link server : when you buy website you will be sent the details to add to this page to make your site go live
Home page must be saved as index.
Html tables must add up - like a jigsaw - cells in a table must be specific size to fit into the table.
create a table :
good practice to add 0's rather than leave boxes blank
Some browsers read blank as 1
table so far...
have to edit height in code - space after width>select heigh and edit
  means 'nothing'
Change bg colour so can see shape in the live preview
star after file name means it hasnt been saved since changes have been made :
SAVE webpage then preview in safari.
10px gap between design and top of screen is impossible to remove in html - can in css
default alignment is left - changeable in code or design mode.
To create table inside table - click inside table and then insert>table again.
go to code - add height
Merge cells
(add colour)
too bump up boxes and make it add up - click on bottom cell- add table then change height to 400px in code....
colour each section to make it easier to differentiate between them while working :
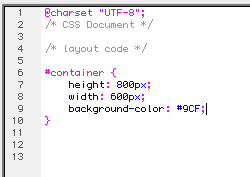
CSS WEBSITE
site>new site> link to new css route folder
html works by - separate pages of code
css - one page of code (style sheet)
create new html page and save, then create new css file and link to css route folder.
save as 'style sheet'
to link style sheet to html site - on html site go to icon and link to css site
'notes' can be used to organise css - e.g. /* css document */ (in grey) = the note doesn't show on the site
Creating a 'div'
alt + 3 creates a # symbol
wrapper/container means table (equiv. in html)
curly bracket { brings up all the specifications possible.
using spaces and new lines keeps it tidy.
semi colon finishes it ;
add width and close with }
CODE IN HTML :
space it out to make it clear to read
add 'div' to code - as you type in div id=" it will bring up 'container)
add </ and it will bring up </div> to close
make sure close brackets!
too add colour to box on stylesheet after width> space> background colour
(semi colon to close)
This should then change colour of box in html design view
(dimensions of box were wrong - switched round dimentions in css and saved ) =
to centralize box add 'position' to style sheet
chose 'absolute'
this allows you to remove gap between table and top of page (absolute positioning)
KEEP SAVING TO PREVIEW IN HTML!!!!!!
safari preview:
to centralize :
Margin-left = minus half of full width
design view will probably no longer work - dreamweaver can't handle it
refresh browser if live safari view doesnt add up
add this to css
then edit in html code - insert div inside container div- use tab key to tab in new div to make it clear
new preview :